Recipe for Mysore Bonda: Your Guide to the Perfect Crispy Snack
Learn how to make the perfect recipe for Mysore Bonda with our easy step-by-step guide. Crispy, tasty, and sure to impress your family!
Posted by
Ever crave those perfectly round, golden-brown fritters from your favorite South Indian cafe? Our recipe for Mysore Bonda brings that experience right into your kitchen—a wonderfully crispy shell giving way to a soft, fluffy inside. This is your guide to turning a few simple ingredients into a completely irresistible snack.
Why This Mysore Bonda Recipe Just Works
Mysore Bonda is more than a simple snack; it's a bite-sized piece of South Indian culinary history. Forget complicated recipes that fall flat. This one zeroes in on authentic techniques to guarantee you nail that perfect texture every single time—light, airy, and bursting with flavor. It’s the kind of treat that feels special but is surprisingly easy to make.
This snack is a classic, with roots in the city of Mysore in Karnataka, India. Its journey started in royal kitchens before it became a beloved street food staple. The traditional method involves a batter of urad dal (black gram lentils) soaked for 8-10 hours, ground into a silky paste with very little water, and then seasoned with spices and coconut. You can learn more about its rich history on the Street Food Bnglr blog.
Keeping It Simple and Mindful
Making incredible food at home shouldn't feel like a chore, and neither should being mindful of what you eat. This recipe is designed for real life—for those times you want to enjoy a homemade treat without obsessing over your nutrition goals.
The best part about cooking from scratch is knowing exactly what goes into your food. No hidden ingredients or preservatives—just simple, wholesome components you can feel good about.
And that’s where a more relaxed approach to tracking comes in. Instead of stressing over every single gram, you can just enjoy the process of cooking and eating. Once your bondas are ready, you could simply tell munchlog.ai, “I had three Mysore Bondas,” and let the app handle the nutritional details. It's all about balancing enjoyment with awareness, not restriction.
Getting Your Ingredients Ready
The secret to a spectacular Mysore Bonda isn't a long, complicated shopping list. It’s all about a handful of fresh, high-quality ingredients working together.
The foundation is urad dal (husked black gram). This is what gives the bondas their protein-rich, fluffy core. When you soak and grind it just right, you get that signature light-as-air interior. To balance that softness, we'll add a little rice flour—that's the trick to getting that perfectly crisp, golden-brown shell.
Building Those Layers of Flavor
With the base sorted, it's time for the aromatics and spices. This is where the magic happens, transforming a simple batter into something truly memorable.
- Fresh Coconut: Finely chopped pieces add a subtle sweetness and a fantastic textural surprise.
- Green Chilies & Ginger: This duo brings a gentle heat and zesty warmth, cutting through the richness of the fried snack.
- Curry Leaves & Black Pepper: These add that classic South Indian aroma and a mild, peppery kick that ties everything together.
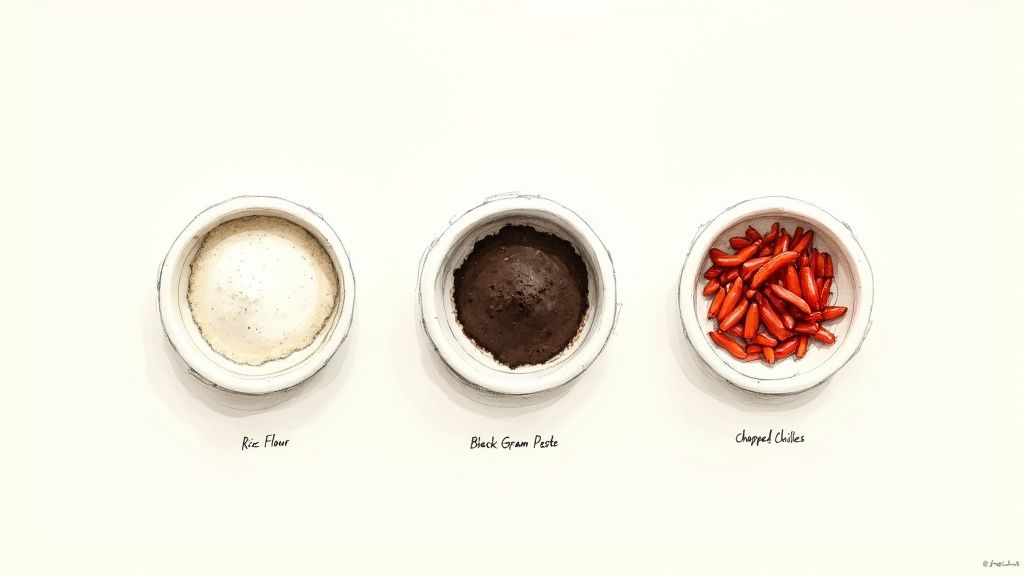
Mysore Bonda Ingredients Breakdown
Here's a quick look at what you'll need and why it's so important for the final dish.
| Ingredient | Quantity (For 4 Servings) | Purpose in the Recipe |
|---|---|---|
| Urad Dal (Skinned Black Gram) | 1 cup | Creates the light, fluffy, and protein-rich base of the bonda. |
| Rice Flour | 2 tablespoons | Adds crispiness to the outer shell, giving it a satisfying crunch. |
| Fresh Coconut (finely chopped) | 2 tablespoons | Provides a subtle sweetness and a delightful chewy texture. |
| Green Chilies (finely chopped) | 2 | Delivers a fresh, zesty heat to balance the flavors. |
| Ginger (grated) | 1-inch piece | Adds a warm, pungent aroma and a hint of spice. |
| Curry Leaves (chopped) | 1 sprig | Infuses the batter with its unique, savory fragrance. |
| Whole Black Peppercorns | 1 teaspoon | Offers a mild, peppery bite and additional texture. |
| Hing (Asafoetida) | ¼ teaspoon | Enhances the savory notes and aids in digestion. |
| Salt | To taste | Brings all the individual flavors together. |
| Oil | For deep frying | The medium for cooking the bondas to golden perfection. |
As you get everything ready, think about how simple it could be to log your meal. Instead of writing everything down, you could just tell munchlog.ai, "I'm making Mysore Bonda with urad dal, coconut, and spices." The app does the work, giving you a quick nutritional estimate without the hassle. It makes mindful eating feel completely natural.
These bondas are fantastic on their own, but they're even better with the right accompaniments. For a classic South Indian experience, serve them hot and crispy with a side of flavorful sambar. If you want to make your own from scratch, check out this great recipe for homemade sambar masala to complete the meal.
How to Make the Perfect Bonda Batter
Getting the batter right is where the magic happens. It's not just about mixing things; the real secret is in the technique. Nail this part, and you're on your way to perfectly light, fluffy bondas every single time.
First, you have to soak the urad dal. This is non-negotiable. Let it soak for at least 5-6 hours, though overnight gives the best results. This step softens the lentils so they grind into a super smooth, airy paste.
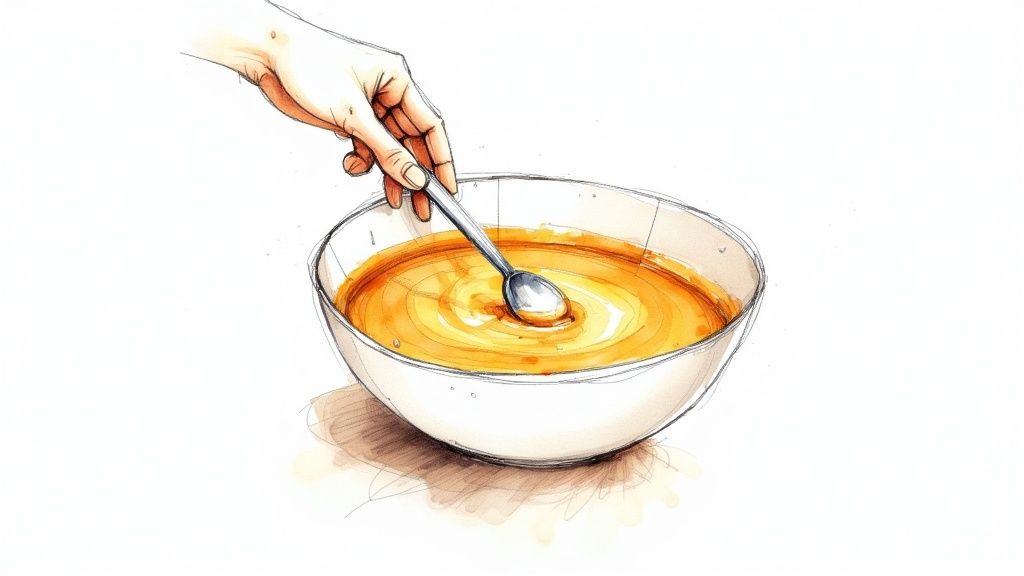
Grinding and Aerating for Fluffiness
After the dal has soaked, drain it completely. This is crucial. You want to use as little water as possible when grinding—just a tablespoon or two at a time to get the blender moving. The goal is a thick, fluffy, cloud-like batter. If it’s too thin, the bondas will soak up oil and come out greasy.
Now for the fun part! Once the batter is ground, whisk it vigorously with a spoon or whisk for a solid 2-3 minutes. This beats air into the mixture, making it incredibly light and ensuring the bondas puff up beautifully in the hot oil.
Here's a little trick to know when it's ready: drop a tiny bit of batter into a bowl of water. If it floats, you’ve done it!
This simple chart lays out the entire process from start to finish.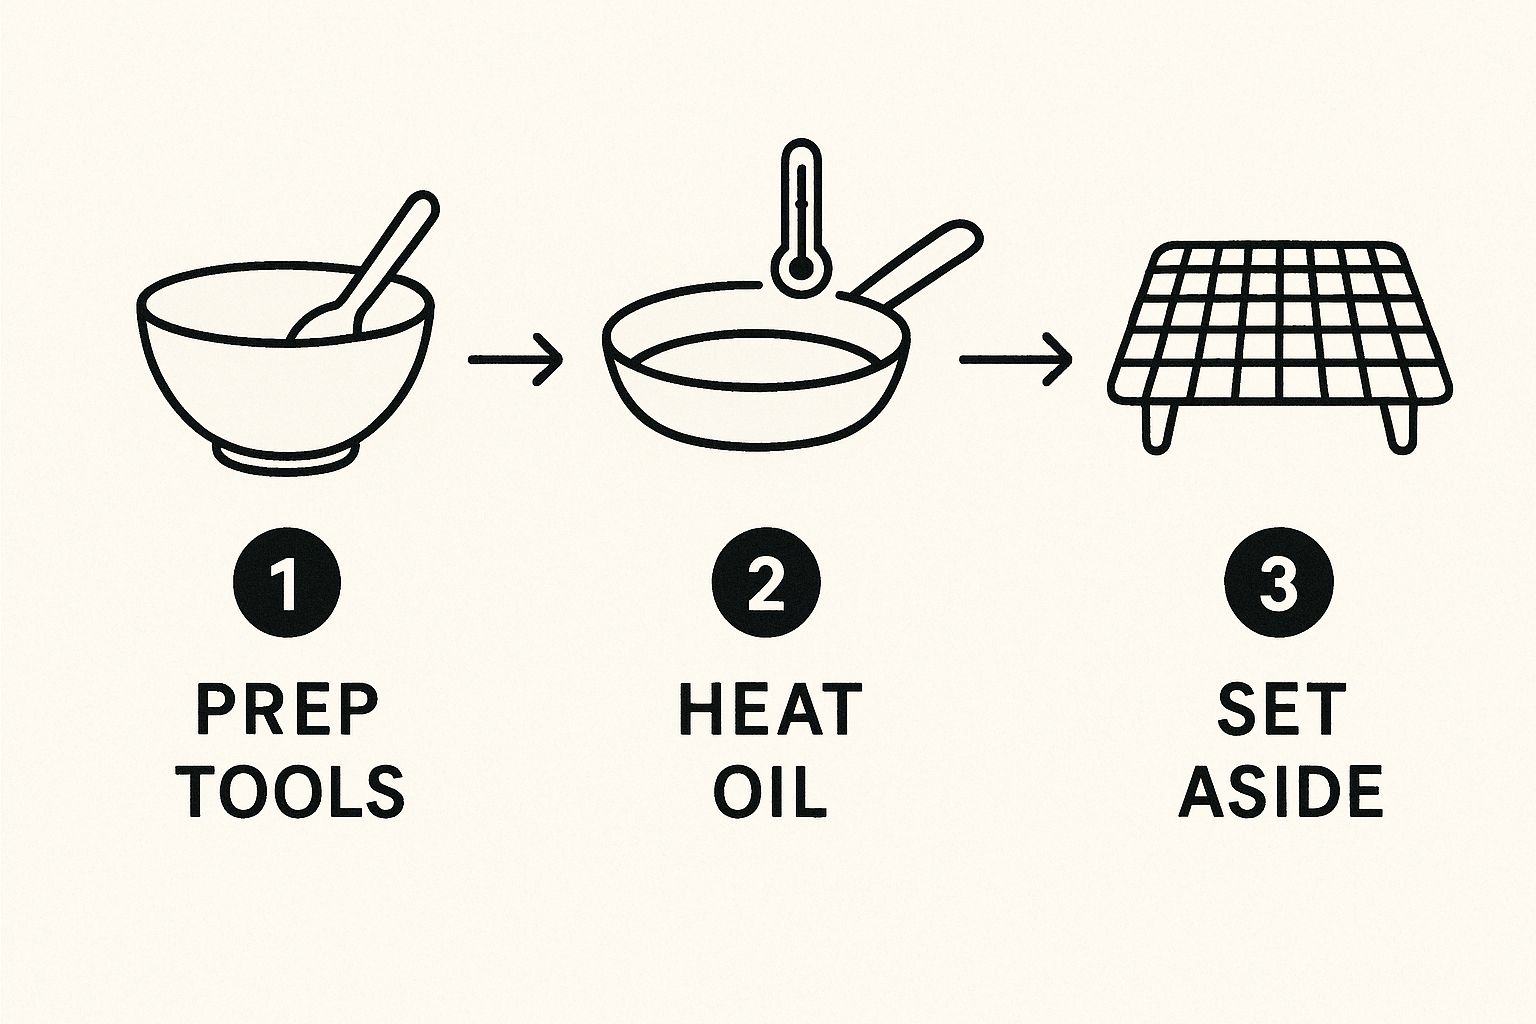
It breaks down the key stages: prepping the batter, getting the oil to the right temperature, frying, and resting the finished bondas.
Adding the Final Touches
With the batter perfectly aerated, it's time to fold in the fun stuff. Gently add your chopped coconut, green chilies, ginger, curry leaves, and crushed peppercorns. Mix them in just enough to distribute them evenly—be careful not to overmix and knock out all that air you just worked in. The salt goes in last, right before you're ready to fry.
Once your perfect batter is ready, imagine how easy it is to keep track. Just say, "Log my Mysore Bonda batter with urad dal and coconut" into munchlog.ai. The app does the work, estimating the nutrition so you can focus on the fun part—cooking!
Frying Your Bondas to Golden Perfection
Alright, this is the moment we’ve all been waiting for! It's time to transform that fluffy batter into irresistible, golden orbs of deliciousness. The secret to a perfectly cooked, non-greasy bonda lies in getting the oil temperature just right.
You're aiming for that sweet spot where the oil is hot enough to create a crispy seal instantly, but not so scorching that the outside burns before the inside cooks through.
Getting the Heat Just Right
The ideal temperature for frying is between 180°C and 190°C (350°F to 375°F). A kitchen thermometer is your best friend here, but no worries if you don't have one. You can use a classic kitchen trick: drop a tiny speck of batter into the hot oil. If it sizzles right away and floats to the top at a steady pace, you’re ready to go.
The Shaping and Frying Technique
Now for the fun part—shaping the bondas. The traditional way is with your fingers. Dip your fingertips in a small bowl of water, then scoop up a lemon-sized portion of batter. The water prevents the sticky batter from clinging to your hand, allowing you to gently drop it into the hot oil.
Remember not to overcrowd the pan. Frying in small batches is key because adding too many at once will cause the oil temperature to drop, leading to greasy results.
Let them fry for a minute or two, until the bottoms are a lovely golden color. Then, use a slotted spoon to carefully flip them over. Keep frying and turning them occasionally until they’re evenly golden-brown and crisp all over.
Once they're cooked to perfection, lift them out and place them on a wire rack or a plate lined with paper towels. This little step is key—it lets any excess oil drain away, ensuring you get that wonderfully crisp exterior.
A quick word on oil: you'll want a neutral oil with a high smoke point. Canola, sunflower, or peanut oil are all fantastic choices. If you're ever unsure, a good cooking oil smoke point chart is a great way to pick the right one.
This recipe isn't just tasty; it also offers a decent amount of protein from the lentils, about 7-8 grams per 100 grams. When you're done enjoying your fresh snack, logging it is easy. Just tell munchlog.ai, "I had 4 fried Mysore Bondas," and you can get a quick look at your macros. For more nutritional details, check out the info on Veg Recipes of India.
What to Serve with Your Bondas (and How to Savor Them)
A freshly fried Mysore Bonda is a thing of beauty on its own, but the right pairing can truly elevate it. The classic combination is a vibrant coconut chutney. Its cool, fresh flavor is the perfect counterpoint to the bonda’s savory warmth. It’s a classic for a reason!
If you want the full South Indian snack experience, brew a pot of authentic spiced chai tea recipe to sip alongside your bondas. The fragrant, warm spices in the chai create a wonderful contrast, making for an incredibly comforting and satisfying break in your day.
Making the Most of Your Homemade Treat
Mindful eating isn't about guilt; it's about enjoyment. Instead of mindlessly snacking, really take a moment to savor the two or three bondas you’ve set aside. Pay attention to the crispy shell, the soft and airy middle, and the blend of flavors. You'd be surprised how much more satisfying a small portion can feel when you simply focus on the experience.
It’s easy to see why this snack is so popular. A 2023 local food survey found that Mysore Bonda made up about 35% of all breakfast tiffin orders in certain South Indian cities. Street vendors often sell hundreds of them every single day.
The goal isn’t restriction; it’s awareness. When you enjoy a homemade treat mindfully, you appreciate the effort, savor the taste, and feel good about your choice.
This is where casual tracking can be incredibly helpful. You don't need a food scale or calorie calculator. Just tell munchlog.ai, “I had three Mysore Bondas with coconut chutney for my evening snack.” The app offers a snapshot of your intake, helping you stay aware without any of the stress.
This relaxed approach makes it easier to fit your favorite treats into a balanced lifestyle that might also include meals like our easy Oat Upma recipe. It's all about building a sustainable way of eating where everything can be enjoyed in moderation.
Common Mysore Bonda Questions Answered

If you're making Mysore Bonda for the first time, you probably have a few questions. Let’s walk through some common hurdles so you can fry up a perfect, fluffy batch with confidence.
One of the biggest frustrations is bondas turning out hard and dense. The culprit is almost always too much water in the batter or not whisking it enough. The real secret to that light, airy texture is beating the batter vigorously for a couple of minutes. This step incorporates air, making the bondas puff up beautifully when fried.
Another question that comes up is whether you can make the batter ahead of time. Absolutely! You can prep the batter a day in advance and store it in the fridge. This actually allows it to ferment a little, which develops a lovely, subtle tang. Just remember one key tip: hold off on adding the salt until you're ready to fry.
Healthier Cooking and Easy Tracking
"Is there a healthier way to cook Mysore Bonda?" This is a great question. While nothing beats the crispy finish of deep-frying, you don't have to miss out if you're watching your oil intake.
A fantastic alternative is using an appe or paniyaram pan. Just lightly grease the molds, spoon in the batter, and cook them over low to medium heat. You’ll end up with wonderfully soft bondas using just a fraction of the oil.
It’s small adjustments like this that make a huge difference. Being mindful of your cooking methods helps you stay aware of what you're eating. You can find detailed info on different recipes by using a good calorie counter for Indian food to stay on top of your goals.
Once you’re done, you can simply tell your tracking app, "I had four pan-fried Mysore Bondas," and get a much more accurate nutritional picture without any extra work.
Ready to make mindful eating feel effortless? With munchlog.ai, you can track your meals just by talking. No typing, no photos, no stress. Start your journey to balanced eating today by visiting https://munchlog.ai.